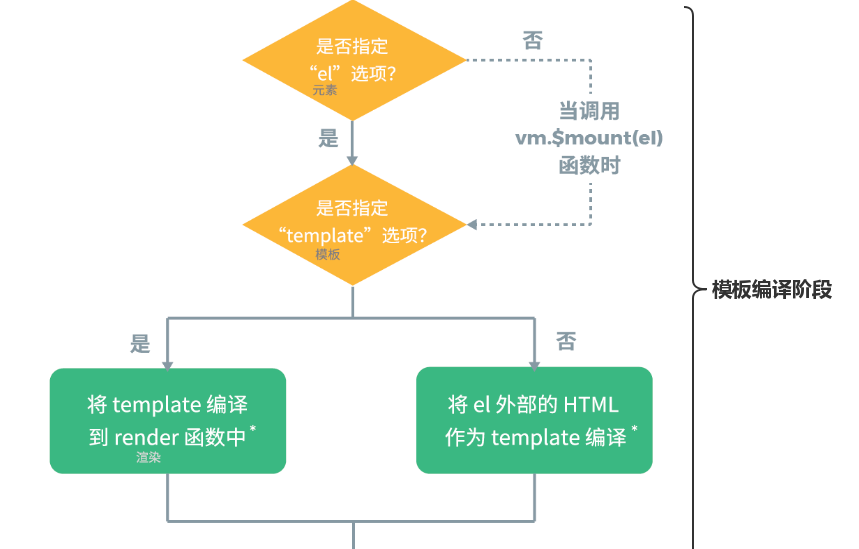
# 模板编译阶段
前几篇文章中我们介绍了生命周期的初始化阶段,我们知道,在Vue初始化阶段完成后之后调用了vm.$mount方法,该方法表示Vue开始进入模板编译阶段,该阶段是一个将 Vue 组件的模板转换为渲染函数的过程。

我们知道Vue 有很多不同的构建版本。实际上,在不同的构建版本中,$mount 的表现形式都不太一样。差异主要体现在完整版 vue.js 和只包含运行时版本 vue.runtime.js。
完整版和只包含运行时版本之间的差异在于是否有编译器,而是否有编译器的差异主要在于 $mount 方法的表现形式。
# 运行时版本
运行时版本根据不同平台入口分别在src/platform/web/runtime/index.js、src/platform/weex/runtime/index.js
在这里我们只探究web端的实现,src/platform/web/runtime/index.js
Vue.prototype.$mount = function ( el?: string | Element, hydrating?: boolean ): Component { el = el && inBrowser ? query(el) : undefined return mountComponent(this, el, hydrating) }成功
2
3
4
5
6
7
代码很简单,只有两行。
- 检测
el是否存在并且是否在浏览器环境中,如果是,则用query函数以根据选择器获取Dom元素 - 最后调用
mountComponent函数进入挂载阶段,mountComponent函数负责执行将Vue组件实例挂载到DOM元素上。此函数我们在挂载阶段分析
# 完整版本
完整版本的入口在 src/platform/web/entry-runtime-with-compiler.js。
import Vue from './runtime/index' // 缓存runtime 版本的$mount const mount = Vue.prototype.$mount Vue.prototype.$mount = function ( el?: string | Element, hydrating?: boolean ): Component { el = el && query(el) // 禁止挂在到body或html标签 if (el === document.body || el === document.documentElement) { return this } const options = this.$options // 如果没有渲染函数时,将template/el编译成渲染函数 if (!options.render) { let template = options.template if (template) { if (typeof template === 'string') { // 如果是#开头,通过选择符获取innerHTML使用 // 如果是字符串不是#号开头,则是用户手动设置的模板,直接使用 if (template.charAt(0) === '#') { // 使用选择符获取模板 template = idToTemplate(template) } // 使用nodeType判断是否为一个真实的dom元素,如果是则使用DOM元素的innerHTML作为模板 } else if (template.nodeType) { template = template.innerHTML } else { return this } } else if (el) { // 返回el提供的Dom元素的HTML字符串 template = getOuterHTML(el) } if (template) { const { render, staticRenderFns } = compileToFunctions(template, { shouldDecodeNewlines, shouldDecodeNewlinesForHref, delimiters: options.delimiters, comments: options.comments }, this) options.render = render options.staticRenderFns = staticRenderFns } } return mount.call(this, el, hydrating) }成功
2
3
4
5
6
7
8
9
10
11
12
13
14
15
16
17
18
19
20
21
22
23
24
25
26
27
28
29
30
31
32
33
34
35
36
37
38
39
40
41
42
43
44
45
46
47
48
49
50
完整版的$mount的实现中,先缓存原型上的$mount,最后return出去的也是缓存的mount.call(this, el, hydrating)。那这个Vue.prototype.$mount是从哪里定义的呢,我们可以从import Vue from './runtime/index'引用中发现,原型上的$mount就是runtime版本的$mount。从而印证了我们之前的结论,不同版本的$mount本质的实现都差不多,差异在于有没有编译器。
接下来一起分析$mount中最主要的功能:编译器。
el = el && query(el) if (el === document.body || el === document.documentElement) { return this }成功
2
3
4
5
首先获取到el后进行判断,是否为body或者html标签。如果为真则return,这也是我们为什么不能将这两个标签当做Vue的根元素的原因。
Vue中为什么不能将根元素直接放在body或html标签?
- 与现有内容的冲突:body和html标签通常包含了其他的HTML内容、脚本或样式,将Vue的根元素直接插入其中可能导致样式和脚本的冲突,或者破坏现有的HTML结构。
- 难以控制挂载位置:将根元素放在body或html标签中,意味着Vue的根组件将占据整个页面,并覆盖掉其他内容。这会导致难以控制组件的挂载位置和布局。
const options = this.$options // 如果没有渲染函数时,将template/el编译成渲染函数 if (!options.render) { let template = options.template if (template) { if (typeof template === 'string') { // 如果是#开头,通过选择符获取innerHTML使用 // 如果是字符串不是#号开头,则是用户手动设置的模板,直接使用 if (template.charAt(0) === '#') { // 使用选择符获取模板 template = idToTemplate(template) } // 使用nodeType判断是否为一个真实的dom元素,如果是则使用DOM元素的innerHTML作为模板 } else if (template.nodeType) { template = template.innerHTML } else { return this } } else if (el) { // 返回el提供的Dom元素的HTML字符串 template = getOuterHTML(el) } }成功
2
3
4
5
6
7
8
9
10
11
12
13
14
15
16
17
18
19
20
21
22
23
24
- 首先,通过检查
options.render的值是否存在来判断是否存在渲染函数。如果渲染函数已经定义,说明用户已经手动指定了渲染函数,那么不需要执行后续的编译过程,直接返回当前Vue组件实例。 - 如果渲染函数不存在,则继续执行下面的逻辑。
- 首先,获取
options.template的值,即用户在Vue组件中定义的模板。将其赋值给变量template。 - 如果
template存在,则继续处理。 - 判断
template的类型,如果是字符串类型,进一步检查该字符串的第一个字符是否为#。 - 如果
template的第一个字符是#,则说明它是一个选择器字符串,需要通过该选择器来获取实际的模板内容。这里使用idToTemplate函数将选择器转换为对应DOM元素的innerHTML作为模板内容。 - 如果
template是一个字符串,但不是以#开头,那么它应该是用户手动设置的模板,直接使用即可。 - 如果
template的类型是一个DOM元素(通过nodeType判断),则将该DOM元素的innerHTML作为模板内容。 - 如果以上判断都不满足,则直接返回当前的Vue组件实例。
- 如果
template经过处理后存在值,说明已经获得了模板内容,可以将其编译为渲染函数并存储在options.render中供后续使用。
获取完模板之后,下一步是将模板编译成渲染函数
if (template) { const { render, staticRenderFns } = compileToFunctions(template, { shouldDecodeNewlines, shouldDecodeNewlinesForHref, delimiters: options.delimiters, comments: options.comments }, this) options.render = render options.staticRenderFns = staticRenderFns }成功
2
3
4
5
6
7
8
9
10
这部分逻辑不多,通过执行compileToFunctions函数可以将模板编译成渲染函数并设置到this.$options上。
关于具体compileToFunctions的内容,我们会在模板编译的部分讲解,此处仅做简单介绍,该函数接收待编译的模板字符串和编译选项作为参数,返回一个对象,对象里面的render属性即是编译好的渲染函数。
# 总结
首先,需要了解Vue源码构建的两种版本:完整版本和只包含运行时版本。完整版本包含编译器,可以在客户端编译模板,而只包含运行时版本则不包含编译器,无法进行模板编译。在只包含运行时版本中,当使用像vue-loader时,*.vue文件内部的模板会在构建过程中预编译成渲染函数,因此不需要在运行时进行编译,也就没有模板编译阶段。
接下来,我们来对比一下完整版本和只包含运行时版本中的$mount方法的区别。$mount方法用于将Vue实例挂载到DOM元素上。在只包含运行时版本中,$mount方法会直接获取到DOM元素后进入挂载阶段,而在完整版本中,$mount方法会先进行模板编译,然后再调用只包含运行时版本的$mount方法进行挂载。
最后,我们来分析模板编译阶段的实现,也就是完整版本中的vm.$mount方法的源码。通过逐行分析源码,我们可以了解在模板编译阶段所做的工作。具体而言,它会从用户传入的el选项和template选项中获取用户定义的内部或外部模板,然后将获取到的模板进行编译,转换为渲染函数。